![[settings]](osx-dns.png)
I am using djbdns instead of bind for my own DNS servers, as well as just about any other machine I use. This includes my laptop, an Apple iBook running Mac OS X.
It was rather interesting, trying to figure out how to get djbdns running under OSX. The userid management system is totally different from anything I had ever seen before, and the mechanism for making something automatically run when the system boots was also rather different. My best source of information on figuring out how to work with OSX has been the book Mac OS X for Unix Geeks, published (of course) by O'Reilly.
The software itself compiled cleanly on my system, after installing the developer packages. I've used both the developer tools from 10.2 and the XCode tools from 10.3, and the command line compiler was able to compile the required programs without any problem. The problem was installing it and making it run automatically...
The book above had a section which explained how to create a StartupItem directory and the two files which need to be inside of it in order for OSX to start up the service. Using the book and a little guesswork I muddled my way through and got a working setup, after three or four tries...
Several months later (when I got ready to write the web page you're reading right now) I did a google search and found several other web pages which explained how to set up services to start when OSX starts... including one which explained how to make daemontools run (which is what I needed.) Rather than duplicating somebody else's work by writing out my own directions here, I have included a link to that page instead, since it was already written and the directions are identical to how I ended up making it work.
I should explain, for those of you who don't know me, that I come from an extensive background in Linux, with some experience on FreeBSD and Solaris... I am not a long-time "mac person", and in fact for years I held a rather low opinion of Mac OS (not of the hardware, mind you, just the operating system.) Then I played with OSX on a Mac in a store, and that all changed...
Anyway.
daemontools is DJB's set of programs for managing services. His djbdns software was designed to run under the daemontools framework, although with a bit of manual tweaking it is possible to run djbdns services under other frameworks. Since daemontools can be used to run other services and because I'm familiar with it, I decided to have djbdns run on my laptop under daemontools.
If you are running OS X 10.4 "Tiger", DJB's original installation instructions will work. It either creates, or adds a line to, the /etc/rc.local file which starts up daemontools after all of the built-in systems are running. This may not be the best solution if you're using daemontools to run djbdns (and DNS is required for any of the other services) but so far it seems to be working for me.
However, there is a bug in the OS X 10.4 kernel, as detailed in this message from djb's "log" mailing list. The poll() function in 10.4's kernel returns the wrong value in some cases, and of course supervise uses this function to implement high-precision time delays, if it detects that it's available when compiling the package.
The same bug appears to be present in OS X 10.5 "Leopard" as well... I just tried installing daemontools and djbdns on my MacBook Pro and saw the same 100% CPU utilization as soon as "supervise" started running- and on the "Core Duo" processor, it took BOTH processor cores up to 100% each. The same work-around (below) solved the problem.
The work-around is to trick the testing procedure by deliberately breaking the program which checks for the poll() function. By making the build process believe that poll() is not available, it will build supervise so that it uses the select() function to implement time delays instead.
The process looks like this: (again, this is only for OS X 10.4 and 10.5)
If you are using an earlier version of OS X, Rob Mayoff has written this page which has a very clear walk-through of how to build daemontools and get it running on an OSX system, as a StartupItems entry.
If you are trying to install djbdns, you need to make sure daemontools is working correctly (specifically, that svscan is running) before you go any further.
The ucspi-tcp package is
required in order to run djbdns. It is a set of programs which deal with
TCP-based connections. Most importantly for djbdns, it includes the
program envuidgid, which is used (normally by root,
the "super-user" account) to run a program as a non-root userid. This is
good because in case the program gets hacked, the attacker doesn't have
root privileges on the machine.)
You should follow DJB's official instructions in order to install the program.
After ensuring that svscan is running and that
the ucspi-tcp programs are installed, you should now download and
compile the djbdns package itself.
This page is DJB's official directions on how to compile and install the software. Follow his directions, they should work on OSX without any problems. Note that the directions on DJB's page will not leave you with a running service- all it does is compiles and installs the programs which will eventually be doing the job of a caching nameserver.
Note that if you plan to run an RBL on the machine, you may want to read about a patch I wrote which allows the rbldns program to return individual A and/or TXT records instead of having one fixed IP address and message for the entire file.
djbdns is designed to run all services as a user other than root. This is to minimize the risk of system damage in the event that one of the djbdns programs is actually "hacked" by somebody (which hasn't happened in the several years that djbdns has been around- see DJB's security guarantee for more information.)
Before you can actually start a dnscache server
(which is the whole point of this web page) we need to create two
userid's for the services- one for the service itself, and one for
handling the log files.
DJB's instructions on setting up dnscache give a walk-through of how to create userid's on a "normal" Linux or *BSD system, but these directions can't really be used here. OSX uses a system called "NetInfo" or "Directory Services" (depending on the version) to store information about the users.
Tiger (OSX 10.4) uses a system called "NetInfo" to keep track of users and groups, and the users need to be added to the NetInfo system instead of the legacy "/etc/passwd" and "/etc/group" files.
These directions will involve using the terminal. If you're not familiar with it, you will find it in the Applications/Utilities folder. Double-click it to start a terminal window.
The first thing we need to do is create a unique "Group ID" value for the djbdns-related userids we will be creating.
Note that the "sudo" command will ask you for a password the first time you run it, as well as if has been more than a few minutes since the last time you ran it. You should enter YOUR password, not the actual root password (if you have created one.)
% sudo nicl / create /groups/djbdns gid 88
Password: You will not see your password as you enter it.
% sudo nicl / create /groups/djbdns passwd '*'
Then we need to create the actual userids- one for the actual dnscache service, and one for the log service.
% sudo nicl / create /users/dnsrun uid 88
% sudo nicl / create /users/dnsrun gid 88
% sudo nicl / create /users/dnsrun shell /bin/false
% sudo nicl / create /users/dnsrun home /nohome
% sudo nicl / create /users/dnsrun realname dnsrun
% sudo nicl / create /users/dnsrun passwd '*'
% sudo nicl / create /users/dnslog uid 89
% sudo nicl / create /users/dnslog gid 88
% sudo nicl / create /users/dnslog shell /bin/false
% sudo nicl / create /users/dnslog home /nohome
% sudo nicl / create /users/dnslog realname dnslog
% sudo nicl / create /users/dnslog passwd '*'
As a convenience, this shell script contains all of the "nicl" commands above. It does not contain the "sudo" command on each line- in order to use it you should save it and then use "sudo sh djbdns-osx-nicl" to run the script as root.
OSX Server systems use "Directory Services" to store information about users and groups within the networks they manage. Leopard (OSX 10.5) also uses this system to store its local users and groups- I guess it was easier for Apple to concentrate on just one set of code (i.e. Directory Services) instead of having to worry about both DS and NetInfo.
The commands involved are actually very similar- instead of using nicl we will be using dscl, and instead of "/" to represent the local machine, we use "." instead. The commands below assume that we're working on a local machine (i.e. directory services path "."), if you are working with a network domain, you will need to adjust the directory services path (the first item after "dscl" on each command line) accordingly.
As a convenience, this shell script contains all of the "dscl" commands above. It does not contain the "sudo" command on each line- in order to use it you should save it and then use "sudo sh djbdns-osx-dscl" to run the script as root.
Note that the instructions above used to use 1088 and 1089 as the numeric UID/GID for the users... I've changed it to use 151 and 152 so that the users can easly be hidden from the login menu.
One side-effect of creating these users is that they might show up on the login window of your machine. Obviously you can ignore them, but I think it looks better if they just plain aren't there to begin with.
On my laptop (running OSX 10.5) I was able to hide these two users with this command:
$ sudo defaults write /Library/Preferences/com.apple.loginwindow HiddenUsersList -array-add dnsrun dnslog
On other machines in the past, I've had to explicitly create the users with numeric UID/GID values below 500 in order to hide them... and on one machine I had to run this command in order to even do that:
$ sudo defaults write /Library/Preferences/com.apple.loginwindow Hide500User -bool YES
I've had mixed results with these commands, depending on whether the machine had been installed as 10.5, or had been upgraded from an earlier version of OS X. Your mileage may vary- I'm sure there are more definitive answers to why these commands didn't work on those particular machines, but I have things working the way I like now, so I'm not going to mess with it anymore.
Once the users are created, you can create and start the dnscache program in the same manner as DJB's instructions. For example...
I keep all of my physical service directories in
/var/service ... technically you can put these directories
wherever you want to. DJB's examples show them being created under /etc
but I don't like that layout.
% sudo mkdir -m 755 /var/service
% sudo dnscache-conf dnsrun dnslog /var/service/dnscache
127.0.0.1
% sudo ln -s /var/service/dnscache /service/
Wait about ten seconds, and then make sure the service is running correctly.
% sudo svstat /service/dnscache
/service/dnscache: up (pid 8206) 7 seconds
You may also wish to look at my ss script. It gives you a more nicely formatted version of the output above, and can also include information about the "log" services corresponding to each service on the list.
The final step is to tell the system to actually use the new nameserver. Go into "System Preferences", and on the "Network" panel, for each location, on the "TCP/IP" tab, in the "DNS Servers" box, enter "127.0.0.1".
Close the window, telling it to apply your changes. You should now be able to watch your DNS queries scroll by if you watch dnscache's log files.
% tail -F /service/dnscache/log/main/current
Let this run in the Terminal window while you pull up web pages, check your mail, or anything else which involves looking at data on the Internet. You should see the queries and answers scroll by in the Terminal window as they happen. (Press Control-C in the Terminal window to stop watching the file.)
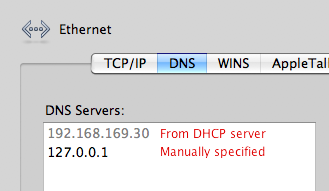
Under Mac OS X versions prior to 10.5, adding a custom nameserver to the system would make those DNS servers be the only ones used. However, under OSX 10.5, any DNS servers received from a DHCP server are still used, in addition to the custom servers you specify- and if the order within the GUI is correct, those servers are actually consulted before the custom servers you specified.
In System Preferences, Network, Advanced, DNS, it looks like this:
It is possible to make the DHCP client ignore the "DNS server" options in the DHCP response. It's not for the faint of heart, but if you've been able to handle the rest of the instructions on this page, you can handle this bit as well.
I have done this on my own laptop (a MacBook Pro) and it does work.
Be aware that this is a GLOBAL change. If you do this, your machine will not use the DNS servers specified by any DHCP server. This may affect your machine's ability to easily work with corporate networks (especially those using Windows Active Directory) or other networks which use private DNS namespaces.
Once you have done this, reboot the machine. When the reboot is finished, the machine will ignore any DNS servers specified by a DHCP server.
For those who are curious, the "ln" command above is creating "hard links" for the file (i.e. multiple filenames for the same inode.) You can achieve the same result using two "mv" commands, but there is a tiny period of time between the two commands during which there is no file (old or new) with that name. If the machine were to crash or the power die during that time, that file would not exist and it's possible the network wouldn't come up at all. Using the "ln" commands like this ensures that there is no time during which that filename doesn't exist.
2005-09-20 Found the mailing list message about the problem with OS X 10.4 and the poll() function, added the work-around in the instructions above. Added the link to the "ss" script, minor formatting clean-up.
![[hacker emblem]](/hacker.png)
![[donate]](/donate.png)